
Replace with SCA2

Question
I would like to update the GC-50 series.
At that time, I would like to use the new drawing software: SCREEN CREATOR ADVANCE 2 (hereinafter referred to as SCA2).
Please tell me the procedure for migrating to the successor model and new tool when updating to the current product.

Answer
Successor model: Orders for the GC-A2 Series will end at the end of June 2025.
We regret to inform you that there is no successor model.
Please note that the following explanation is intended for customers who have the GC-A2 Series as a spare part.
The GC-50 series is currently being replaced by the GC-A2 series, but it is not a fully compatible product.
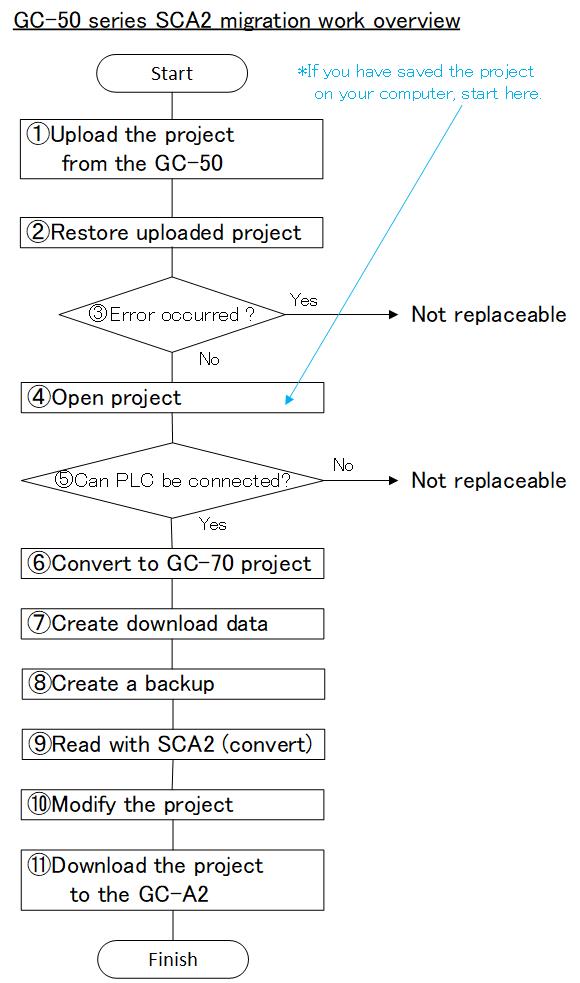
The project migration procedure when using the new tool (SCA2) is as follows.
For details, please read the explanation below from the model number comparison table.
Notes
1. If the project for GC-50 is not on your computer, you need to perform operations such as uploading from the HMI and restoring the uploaded project.
2. If the project uploaded from the HMI does not have editable screen data, or if you are using a connected device (PLC) that is not compatible with SCA2, it cannot be replaced.
3. The GC-50 series has a DSUB 9-pin (female) serial communication port connector, while the GC-A2 series has a DSUB 15-pin (male).
* If you want to use the cable used for the GC-50 as it is, create a connector conversion cable.
* For the conversion cable, see here.
4. In addition, display restrictions will occur due to changes in screen resolution.
Model number comparison table
| GC-50 | Successor GC-A2 | Screen size |
|---|---|---|
| GC-53LM | GC-A24-RS | 7.0 inch wide 800×480(WVGA) |
| GC-53LM2 | ||
| GC-53LM3 | ||
| GC-53LC | ||
| GC-53LC2 | ||
| GC-53LC3 | ||
| GC-55EM | GC-A26 | 10.4 inches 800×600(SVGA) |
| GC-55EM2 | ||
| GC-56LC | ||
| GC-56LC2 |
Replacement procedure
If you have a project on your computer, start with “Open the project”.
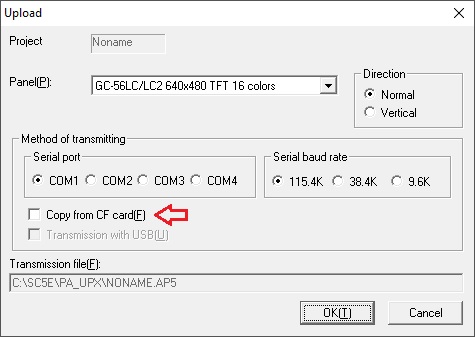
Upload
1. Attach a commercially available USB/serial converter to your computer and set it to either COM1 to COM4.
* For COM port settings, see here.
2. Please connect PC and GC-50 with GC-S1C1-DEE download cable.
* Click here for the down cable connection diagram Please take a look.
3. Touch the upper left and lower right of the GC-50 screen at the same time to switch to the system screen.
4. Touch “Download” to put the GC-50 in the download waiting state.
5. Select “Project”-> “Upload”-> “Upload” of SCREEN CREATOR 5 (hereinafter SC5).
6. Select the model number in “Panel”.
7. Select the COM port number and communication speed of the PC to which the HMI is connected in “Transfer method”.
8. Uncheck “copy to CF card” and press “OK”.
Restore
After uploading, execute SC5 “Project”-> “Upload”-> “Restore Uploading Project”.

E250 error
At this time, if the message “E250 project has not been downloaded” appears, the editable project has not been downloaded to the HMI side, so no further work can be done.
For details, refer to the user’s manual “Vol.2 Operation page.1-13”.
Because it was downloaded without checking “Project file transmission and upload edit enable” when downloading.
Open the project
1. Select the project from “Project”-> “Open” of SC5 and press “OK”.

Check connected devices
1. Check if the connected device you are using is listed in “GC-7x Series Compatible Manual 3-2. Compatible PLC”.
2. If it is not on the list, no further work can be done.
Project conversion
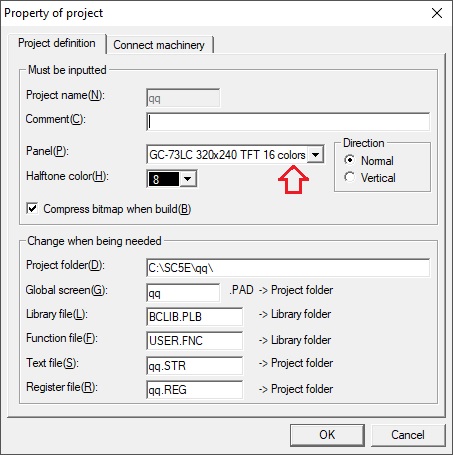
1. Change the model number of “Panel” from “Project”-> “Property of Project” of SC5 to “GC-7x” and press “OK”.
2. For GC-53LM(2/3), select GC-73LM. * Converted to background color: black, object color: white
3. For GC-53LC(2), select GC-73LC.
4. For GC-55EM(2), select GC-76LC (mono). * When placed horizontally, the 80 dots at the bottom of the screen will be a margin (when placed vertically, the right side of the screen).
5. For GC-56LC(2), select GC-76LC.
Create download data
1.Select “Project”-> “Download” of SC5.
2.Check “Copy to CF card”, “Compile all the screen again”, “Project file transmission and upload edit enable”.

3. Press “Build”.
Make a backup
1. Check “Library member being used is made a backup also” from “Project”-> “Backup”.
2. After specifying the backup destination folder name, press “OK”.

New tool: Read with SCA2
1. Start SCA2.
2. From “File” “Open File”, set “File of type” to “GC-5x/7x Project File (*.PRO)” and select the folder backed up by SC5.

3. Select “*.PRO file” in the folder and press “Open” to start file conversion.
Project modification
1. After the conversion is completed, if any errors occur, correct them.
2. After modifying the project, download it to GC-A2.
Download the project to GC-A2
1. Turn on the power of GC-A2.
2. Connect the PC and GC-A2 with a USB cable.
* If you connect for the first time, the device driver will be installed, so wait until the installation is completed.
3. Go to SCA2 “Panel”-> “Download”.
4. Check “Transfer to panel via USB”, “Compile all the screen again”, “Project file transmission and upload edit eneble”, and press “Build and transmit”.

Inquiry
Click here for inquiries by email