How Can We Help?
Write Project to PLC

Question
I would like to read a PLC program saved on my computer and write it to the PLC.
Please tell me how to operate the programming software.

Answer
Connect port 1 (programmer port) to your computer.
Start the programming software, read from the computer, and write to the PLC.
Please see the steps below for details.
procedure
D0/D2/SU(D4)/SJ/PZ series software used: kpp
This procedure is an introduction using D2-260 as an example.
1.Start kpp.
2.Select “Open are existing project”.
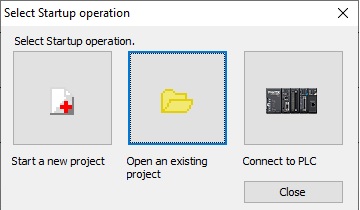
3.Open the project.
4.Click “Add” to add connection conditions to the “Link Setup”.
* If the “Link Name” is already registered, go to 7.
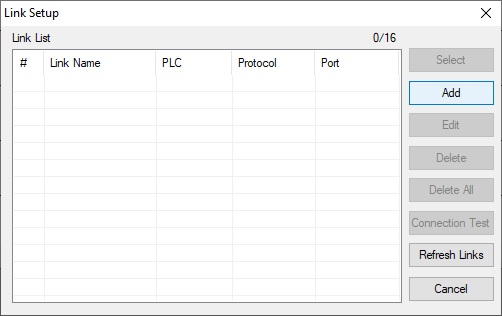
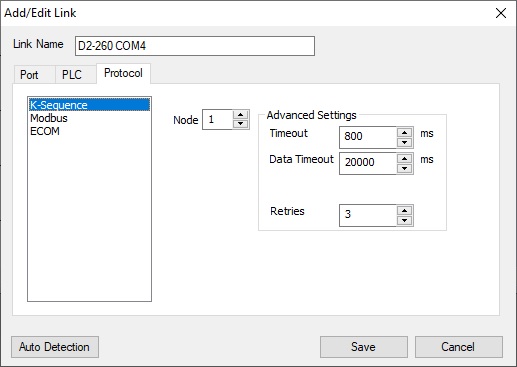
5.Enter the “Link Name”. Select the “COM port” to use and set communication conditions.
(Baud Rate:9600 , Parity:Odd , Data Bit:8 , Stop Bit:1 , Flow Control:None)
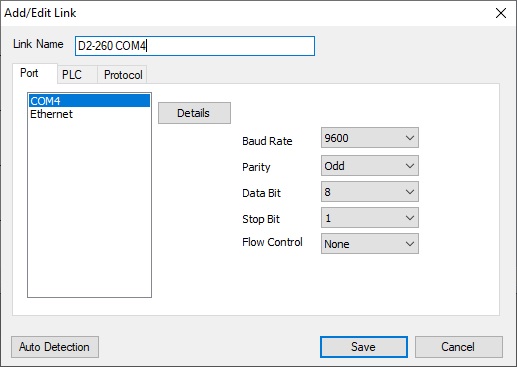
6.Switch tab to “PLC”,Select “PLC Series” and “PLC Model”.
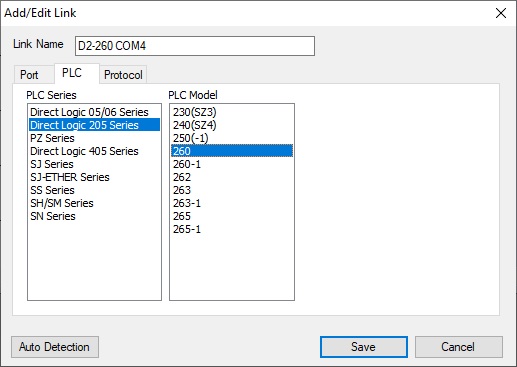
7.Switch tab to “Protocol”,Select “K-Sequence” and “Node 1”.
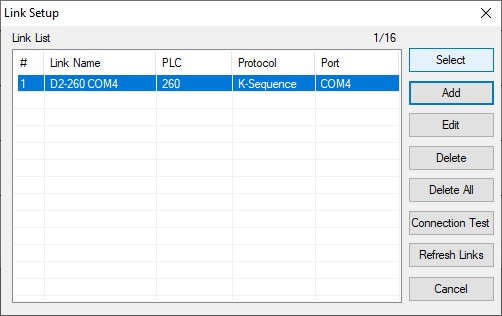
8.”Link Name” will be registered in “Link Setup”, so click “Select”.
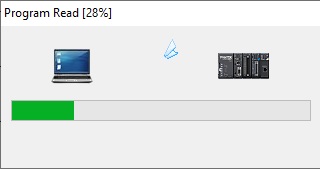
10.Program reading from the PLC begins.
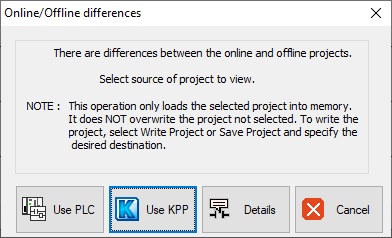
11.When reading is complete, select “Use KPP”.
12.Select “Write PLC”->”Write Project into PLC” from the menu to start writing the project.
1.Start kpp.
2.Select “Open are existing project”.

3.Open the project.
4.Click “Add” to add connection conditions to the “Link Setup”.
* If the “Link Name” is already registered, go to 7.

5.Enter the “Link Name”. Select the “COM port” to use and set communication conditions.
(Baud Rate:9600 , Parity:Odd , Data Bit:8 , Stop Bit:1 , Flow Control:None)

6.Switch tab to “PLC”,Select “PLC Series” and “PLC Model”.

7.Switch tab to “Protocol”,Select “K-Sequence” and “Node 1”.

8.”Link Name” will be registered in “Link Setup”, so click “Select”.

10.Program reading from the PLC begins.

11.When reading is complete, select “Use KPP”.

12.Select “Write PLC”->”Write Project into PLC” from the menu to start writing the project.
D0/D2/SU(D4)/SJ/PZ series software used: DirectSOFT
This procedure is an introduction using D0-06 as an example.
1.Start DirectSOFT.
2.Select “Open”,to open the project.
3.Select “PLC” -> “Connect” from the menu.
4.Click “Add” to add connection conditions to the “Select Link”.
* If the “Link Name” is already registered, go to 9.
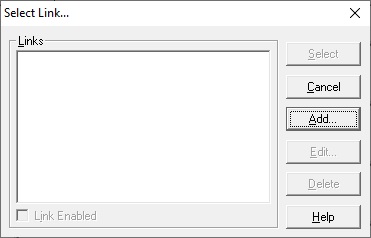
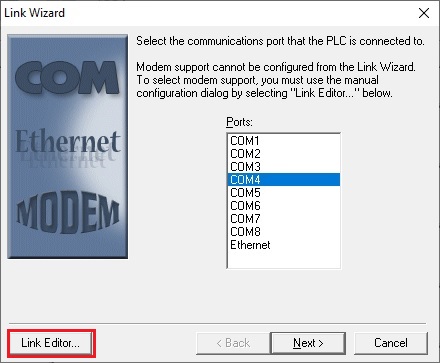
5.Select the “COM port” to use and Click “Link Editor”
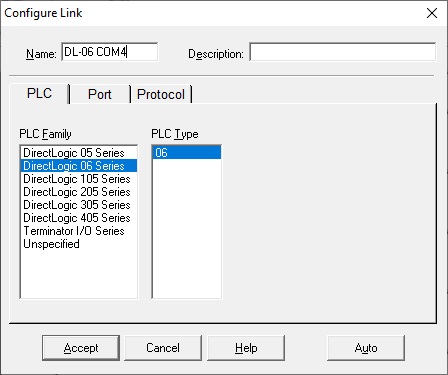
6.Enter the “Link Name”. Select “PLC Family” and “PLC Type”.
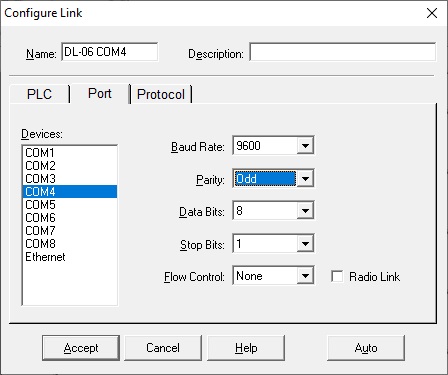
7.Switch tab to “Port”,set communication conditions.
(Baud Rate:9600 , Parity:Odd , Data Bit:8 , Stop Bit:1 , Flow Control:None)
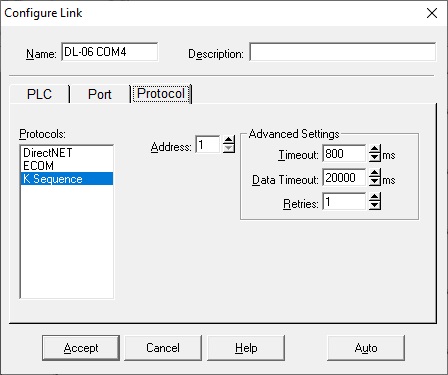
8.Switch tab to “Protocol”,Select “K-Sequence” and “Address 1”.
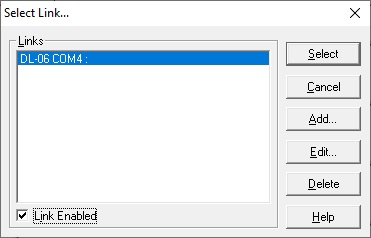
9.”Link Name” will be registered in “Select Link”, so click “Select”.
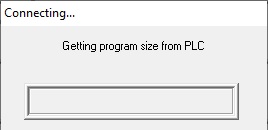
10.Program reading from the PLC begins
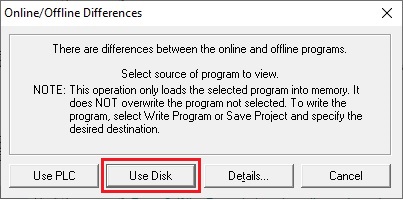
11.When reading is complete, select “Use Disk”.
12.Select “File”->”Write Program”->”to PLC” from the menu to start writing the project.
1.Start DirectSOFT.
2.Select “Open”,to open the project.
3.Select “PLC” -> “Connect” from the menu.
4.Click “Add” to add connection conditions to the “Select Link”.
* If the “Link Name” is already registered, go to 9.

5.Select the “COM port” to use and Click “Link Editor”

6.Enter the “Link Name”. Select “PLC Family” and “PLC Type”.

7.Switch tab to “Port”,set communication conditions.
(Baud Rate:9600 , Parity:Odd , Data Bit:8 , Stop Bit:1 , Flow Control:None)

8.Switch tab to “Protocol”,Select “K-Sequence” and “Address 1”.

9.”Link Name” will be registered in “Select Link”, so click “Select”.

10.Program reading from the PLC begins

11.When reading is complete, select “Use Disk”.

12.Select “File”->”Write Program”->”to PLC” from the menu to start writing the project.
SA/SR(D3) series software used: DirectSoft5
This procedure is an introduction using D3-330 as an example.
1.Start DirectSOFT.
2.Select “Open”,to open the project.
3.Select “PLC” -> “Connect” from the menu.
4.Click “Add” to add connection conditions to the “Select Link”.
* If the “Link Name” is already registered, go to 9.

5.Select the “COM port” to use and Click “Link Editor”

6.Enter the “Link Name”. Select “PLC Family” and “PLC Type”.
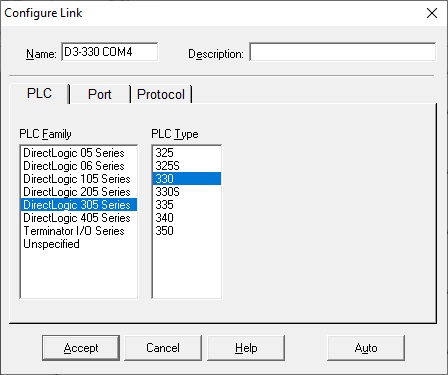
7.Switch tab to “Port”,set communication conditions.
(Match the settings of E-03DM(D3-DCU))
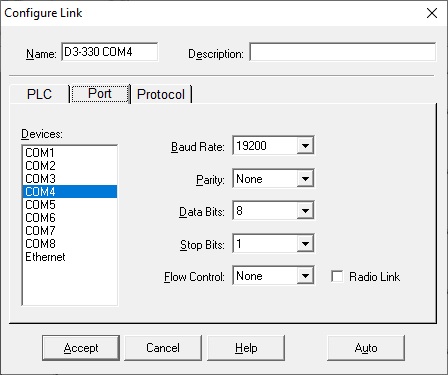
8.Switch tab to “Protocol”,Select “DirectNet” and “Address 1”.
(Match the address settings of E-03DM(D3-DCU))
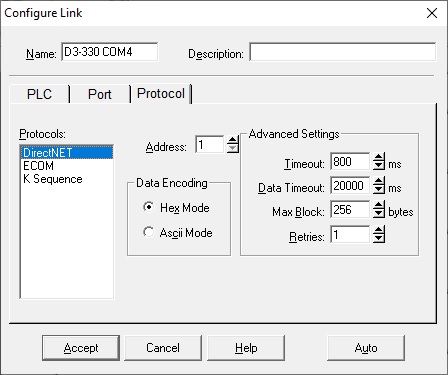
9.”Link Name” will be registered in “Select Link”, so click “Select”.

10.Program reading from the PLC begins

11.When reading is complete, select “Use Disk”.

12.Select “File”->”Write Program”->”to PLC” from the menu to start writing the project.
1.Start DirectSOFT.
2.Select “Open”,to open the project.
3.Select “PLC” -> “Connect” from the menu.
4.Click “Add” to add connection conditions to the “Select Link”.
* If the “Link Name” is already registered, go to 9.

5.Select the “COM port” to use and Click “Link Editor”

6.Enter the “Link Name”. Select “PLC Family” and “PLC Type”.

7.Switch tab to “Port”,set communication conditions.
(Match the settings of E-03DM(D3-DCU))

8.Switch tab to “Protocol”,Select “DirectNet” and “Address 1”.
(Match the address settings of E-03DM(D3-DCU))

9.”Link Name” will be registered in “Select Link”, so click “Select”.

10.Program reading from the PLC begins

11.When reading is complete, select “Use Disk”.

12.Select “File”->”Write Program”->”to PLC” from the menu to start writing the project.
Notes
When using a commercially available USB-serial port conversion cable, install the manufacturer’s genuine device driver and check with the device manager of the personal computer that the serial port has been added.
At that time, set the serial port to be COM1 to COM8.
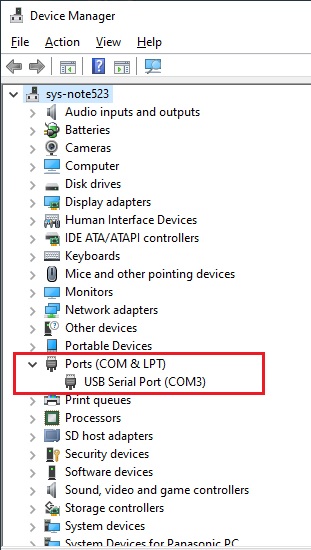
At that time, set the serial port to be COM1 to COM8.

Inquiry
Technical support
Click here for inquiries by email
Click here for inquiries by email
